Roses are...white?
My best friend and I were recently asked to make a wedding cake for a lady in our church and we (well, me anyway :)) jumped at the chance to make another wedding cake. Our first wedding cake was in fact our first attempt at a fondant decorated cake full stop, so to say it was a challenge would be an understatement. The result was quite good for a first go, but I'm hoping that our next attempt will be all the better for the experience and practice.
So for this cake we are going for a more antique, elegant look and to achieve this we are using roses...
Fondant Rose Tutorial
Fondant roses can be challenging, but hopefully this tutorial will make them appear a little less frightening and a lot more fun!
What You Will Need
Firstly you will need some white fondant and either add Gum Tragacanth to it according to the directions on the packet, or purchase fondant that already has this added. The Gum helps with the handling and will cause the fondant to set hard into the shapes desired. You will also need water to help the fondant to stick together, cornflour to keep it from sticking to you, an air-tight container to keep the petals in to prevent hardening and a paintbrush to apply the water.Step 1 - Petal Power
Firstly you will need to make five sets of petals. Here you can see that you will need two rows of three petals, one row of four petals, and two of five. Petals are made by taking a small amount of fondant and rolling it into a ball, and then flattening this out using your thumb and for-finger until they are thin. (The thinner the better and it's okay if they are a little rough around the edges, this adds to the realism of the rose.) Once they are made, keep them in an air-tight container so they don't dry out and become too hard to form into the rose later on. I usually make the petals as I go to prevent hardening, but if you find it easier to make all the petals first then go for that technique. I made them all first this time for demonstration purposes.Step 2 - Making the Bud
1. Take the small ball, and the first row of three petals.
2. Paint a small amount of water onto the right hand side and bottom of all three petals. This will slightly dissolve the fondant and act as a glue.
3. Form the petals around the ball so that each one over laps the other. (This is shown better further down as it was difficult to take pictures of this step in the process.)
Pinch the bottoms of the petals together to form a nice smooth base so that the rose will be able to sit upright later on. You now have a rose bud!
Step 3 - Deja Vu
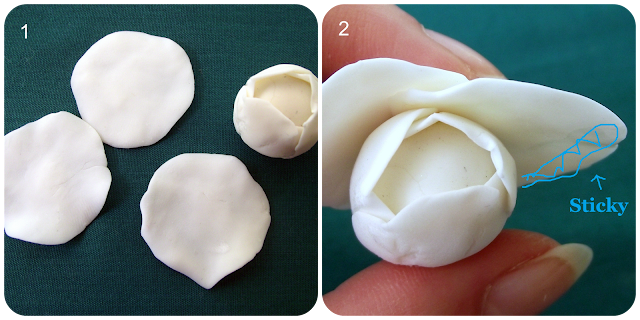
1. Now take the next row of petals and again paint water on the right hand side and bottom of each petal.
2. Here you can see a little better what I mean by overlapping the petals.
Step 4 - Then there were four...
Now you simply repeat the process shown above except this time using four petals. Paint with water, overlap each slightly and pinch the base till it sits flat.
Basically here I gradually increased the size of each petal and, as you can see, have gone from four petals to five.
Step 6 - Last Round
Step 7 - The Final shaping
1-2. This is the fun bit! Simply using your fingers, pinch and pull on the petals to create a more random, realistic rose appearance. If the petals crack a little don't fret, it all adds to the realism. When have you ever seen a rose that didn't have a few defects. :)
3. I then used various cake decorating tools (anything that was lying around really) to hold the drooping lower petals in place while they set.
Leave to dry...and...CONGRATULATIONS...you have made a rose!
 The Rose can be finished at any stage to determine the maturity of the bloom. For example, you could have stopped after step three and you would have been left with a beautiful rose bud. After step four, you would have had a just opening bud and so forth.
Okay, off to make some more. :)
God Bless,
Little Wren xxx


