Monday 9 December 2013

St. George Jersey Cake


I'm not a St. George supporter, however when my best friend and I were asked to make a St. George Jersey cake, as one of our first paid jobs, we jumped at the chance. Below is a rough tutorial on how to go about making a jersey cake. You could use the same steps for making any football teams colours and styles. Go the Storm! *cough, cough*


As we are visual people we like to set everything out as we go to see how the end result will look. We are usually designing as we go also so, as you can see above, we have placed out the cutters to see how it will all look once finished. (As we only have one of each letter there is a little interesting spelling going on. :))The torso of the jersey was cut from one large slab cake (sometimes called a lamington slice tin) and the arms were cut from another small cake. The template for the cake can be found here

The next step is to patch the cake with small pieces of fondant icing. (Sorry I don't have a picture of this step.) This will help the cake to end up with a much smoother finish. You can either use a small amount of egg white to stick the fondant on, or melted jam (explained below). Then ice the cake with butter-cream icing. (Sorry I don't have a picture of this step either.) The butter-cream icing not only helps the fondant to stick to the cake, but also helps keep the cake moist, improves the taste greatly, and for people who hate fondant, they can simply peel the fondant off their piece of cake before eating and still be left with nice tasting icing. Refrigerate the icing until firm. Other options would include chocolate ganache, or if you don't wish to have any icing underneath, heat a small amount of jam (any flavour you like) and paint the warm jam onto the cake. 


Roll the fondant out until about 1-1.5 cm thick (approximately 1/2 inch) and carefully drape over the cake. Start to smooth the fondant, beginning with the top of the cake first, using circular motions with a smoothing paddle. Gently work down the sides until the entire cake is smooth. 


Carefully cut the fondant around the edge of the cake (If you are using a cake board, be very careful not to mark it). Try not to cut too close to the cake as it's better to have extra left around the edge then not enough. Using the smoothing paddle again, push the cut edges into the sides of the cake and smooth the edges again. (Sorry I don't have a picture of this step.) If the fondant begins to go hard before you have made it smooth enough, run your hands over the cake for a bit. The heat from them will help to slightly melt the fondant and allow for extra smoothing. 


For the dragon I took a tooth pick and traced around the dragon shape onto the fondant. (See template). Then with some edible chalk (which I'd crushed it into a powder) I coloured-in the shape of the dragon using a small brush. A black edible pen was then used to outline the dragon and flame.

For the collar and V we did this free hand. We used the template I'd drawn out, but made the strips slightly bigger then the drawn version as the cake had become bigger because of the added width caused by the fondant. The words were cut out using alphabet cutters. 


And there you have a jersey birthday cake! 


God Bless,
Little Wren xxx
Sunday 8 December 2013

Birthday and Special Occasions Cakes

Here is a selection of cakes made by my best friend and I. 


Death by Chocolate 


The ring of balls around the edge are chocolate cake pops.

Sweet and Simple 


Strawberries and Cream 


ST. George Birthday Cake 


The dragon was made using edible chalk and edible pens. Click here for the tutorial on how to make this cake. 

Our First Wedding Cake 


iPhone 21st 


Akubra and Australian Flowers 


These flowers are made from chocolate that we coloured and then pipped onto baking paper. We then placed them in the fridge to harden. These make awesome flowers as they are easy to make, look great, and taste good too. :) 

Balloons and Streamers


 Christmas Trees and Cup Cakes 


These little Christmas trees were inspired by ones that we saw on Better Homes and Gardens however we struggled to make the trees stable enough when simply using tiny patty cakes for the bases. For our version , we made the bases as cake pops (pressing the cake pop mixture into little patty cake trays to set). There are strawberries under the icing and the stars and baubles are made from fondant. 

Floral Cup Cakes 


Wedding Cakes 


This wedding cake is a chocolate cake with butter cream icing. 


This wedding cake is a light fruit cake with fondant icing. 

The wedding that we did these two cakes for was an afternoon/evening wedding were the Bride and Groom wanted a cake for the afternoon tea and also the reception as only close family members were invited to the reception, but they wanted everyone to get some cake. The chocolate cake was for the afternoon tea and the fruit cake was for the reception. For the tutorial of how to make the roses used on these cakes click here

Dora the Explorer Hot Air Balloon Cake 


This cake was inspired by one we saw on the internet. 

Australia Day Cake


God Bless,
Little Wren xxx

Hemp Bunting

Two things that are very big in the craft/DIY world at the moment are hemp and bunting. So why not make hemp bunting? 


Print out the bunting template and trace onto your hemp (I found it easier to make my template out of cardboard). Carefully cut this out. Fold over the top about 3cm (1 inch) and sew along the very bottom edge to join. You want to leave plenty of room for your string to easily thread through later on. 

Voila! You have made bunting! 


To reduce fray, add a bead of craft or PVA glue along the edges of each bunting flag and allow to dry. (This will dry clear.)


To add letters to your bunting, first draw your letters onto paper, cut out paper letters and trace them onto fabric. Then cut out.

Above you can see where I sewed by the green line I've added. You don't want to sew all the way around as we are going to add some stuffing to the letters to make them stand out more and appear 3D.

Add the stuffing (I used old pillow stuffing) and sew along the un-sewn edge to finish.


Continue sewing on letters until you complete the word of your choice. Finally, thread through some string and you're all done! 

God Bless,
Little Wren xxx


Wednesday 9 October 2013

Tutorial - Fondant Roses

Roses are...white?

My best friend and I were recently asked to make a wedding cake for a lady in our church and we (well, me anyway :)) jumped at the chance to make another wedding cake. Our first wedding cake was in fact our first attempt at a fondant decorated cake full stop, so to say it was a challenge would be an understatement. The result was quite good for a first go, but I'm hoping that our next attempt will be all the better for the experience and practice.

So for this cake we are going for a more antique, elegant look and to achieve this we are using roses...

Fondant Rose Tutorial 


Fondant roses can be challenging, but hopefully this tutorial will make them appear a little less frightening and a lot more fun! 

What You Will Need

 Firstly you will need some white fondant and either add Gum Tragacanth to it according to the directions on the packet, or purchase fondant that already has this added. The Gum helps with the handling and will cause the fondant to set hard into the shapes desired. You will also need water to help the fondant to stick together, cornflour to keep it from sticking to you, an air-tight container to keep the petals in to prevent hardening and a paintbrush to apply the water.


Step 1 - Petal Power 

Firstly you will need to make five sets of petals. Here you can see that you will need two rows of three petals, one row of four petals, and two of five. Petals are made by taking a small amount of fondant and rolling it into a ball, and then flattening this out using your thumb and for-finger until they are thin. (The thinner the better and it's okay if they are a little rough around the edges, this adds to the realism of the rose.) Once they are made, keep them in an air-tight container so they don't dry out and become too hard to form into the rose later on. I usually make the petals as I go to prevent hardening, but if you find it easier to make all the petals first then go for that technique. I made them all first this time for demonstration purposes.


Step 2 - Making the Bud


1. Take the small ball, and the first row of three petals.
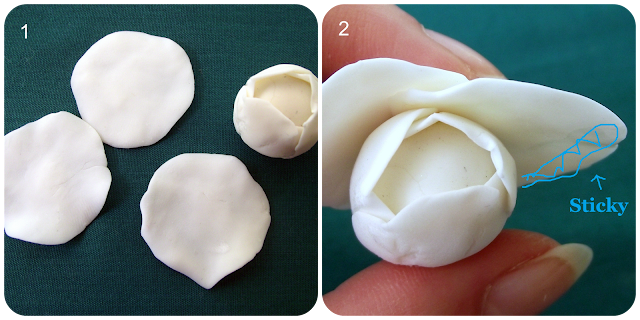
2. Paint a small amount of water onto the right hand side and bottom of all three petals. This will slightly dissolve the fondant and act as a glue. 
3. Form the petals around the ball so that each one over laps the other. (This is shown better further down as it was difficult to take pictures of this step in the process.)

Pinch the bottoms of the petals together to form a nice smooth base so that the rose will be able to sit upright later on. You now have a rose bud!

Step 3 - Deja Vu


1. Now take the next row of petals and again paint water on the right hand side and bottom of each petal. 
2. Here you can see a little better what I mean by overlapping the petals.

4-5. Pinch the petals in at the bottom again so that the rose will sit flat. 

Step 4 - Then there were four... 

Now you simply repeat the process shown above except this time using four petals. Paint with water, overlap each slightly and pinch the base till it sits flat.


Basically here I gradually increased the size of each petal and, as you can see, have gone from four petals to five.

Step 6 - Last Round


Step 7 - The Final shaping


1-2. This is the fun bit! Simply using your fingers, pinch and pull on the petals to create a more random, realistic rose appearance. If the petals crack a little don't fret, it all adds to the realism. When have you ever seen a rose that didn't have a few defects. :)
3. I then used various cake decorating tools (anything that was lying around really) to hold the drooping lower petals in place while they set. 

Leave to dry...and...CONGRATULATIONS...you have made a rose! 


The Rose can be finished at any stage to determine the maturity of the bloom. For example, you could have stopped after step three and you would have been left with a beautiful rose bud. After step four, you would have had a just opening bud and so forth.

Okay, off to make some more. :)

God Bless,
Little Wren xxx


Sunday 22 September 2013

Down in the Garden...

Painting is a definite passion of mine and whenever I have the time you'll see me walking around my mother's beautiful garden taking photo's of birds or picking flowers to paint. Then I'll scurry on back into my craft room and let the artistic juices flow! :)

One of my latest art projects was to paint a set of cards. So using the before mentioned garden of paradise as inspiration, and a photo of a Blue Wren off Google Images, (mine wouldn't sit still long enough) I undertook the challenge.

In the Garden...   


This painting was completely inspired by my mother's garden right down to the humble cabbage moth. :) Her garden is always full of Terracotta pots bursting with daisies and blossoms and here I tried to recreate that. In the cards that I've made with this painting I included the caption in the empty left side blue sky "Thank You". I had at first intended to have "The Joy of the Lord is My Strength" but I needed a Thank You card and the caption stuck.

To add a caption I scan the paintings in and then either use Publisher or simply Word. I then print them out on art paper, cut them out, attach to a card...and VOILA...card is made.


Daisy...   

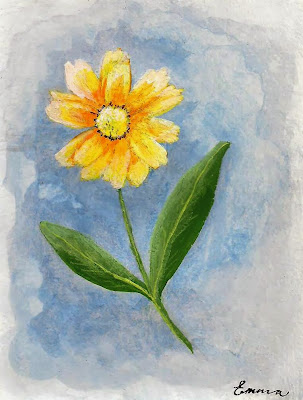
Again the garden was used for inspiration as this daisy was taken from paradise to be painted and then left to live out it's days in the seclusion of my craft desk. I however greatly enjoyed it's beauty and am ever amazed at the complexity and incredible design of God's creation.


Where the Blue Wrens Sing...

This pretty fella was painted from a picture I found on Google Images. We have so many Blue Wrens and Jenny Wrens in our garden and I can never get enough of watching their silly antics and clever behaviour. A couple of years back there was a family of wrens living in the Port Wine Magnolia outside my bedroom window and to watch the way they played together and snuggled up to keep warm was so sweet to watch that they have been my favourite birds ever since.

I really enjoy painting cards for their simplicity and the chance they give to try painting objects from real life and photo's. Another benefit is how quickly they can be made as they're only little and a new piece of artwork is made without having spent hours on it. Aside from the benefit of always having a handmade card to give, sets of handmade (and painted) cards can make lovely gifts and once the original paintings are done, it simply becomes a print, cut and stick job.:)

For any budding artist out there I recommend having a go at the humble card. They are quick, fun and very rewarding to make.

God Bless,
Little Wren xxx